All communication from your clients will be connected to your unified team inbox. The inbox receives incoming messages from your forms, erxes messenger and integrations (i.e Facebook, email, etc). If you have multiple organizations or need certain inboxes for certain team members, you can make channels or brands as they create separate team inboxes.
How to navigate the team inbox
On the left side of the inbox, new messages will appear in bold. You will also be able to see the responder and client information in the inbox.
- Click on
 on the top right of the inbox view or hide the following features.
- Channels
- Brands
- Integration
- Tags
- Resolve all: Click to resolve all of the messages.
- Date: View messages from certain dates
- Status: View messages with the following statuses.
- Unassigned: Messages that are not assigned to a team member.
- Participating: Team members that are participating in the messages.
- Awaiting Response: Messages that are awaiting a resolution.
- Resolved: Messages that have already been resolved.

- In the main messaging area, you can answer customer questions directly and also discuss the issue with your team members in one location. This nullifies the need to go onto other sources to ask team members about the incoming enquiry you may not expertise in. You can also customize the following:
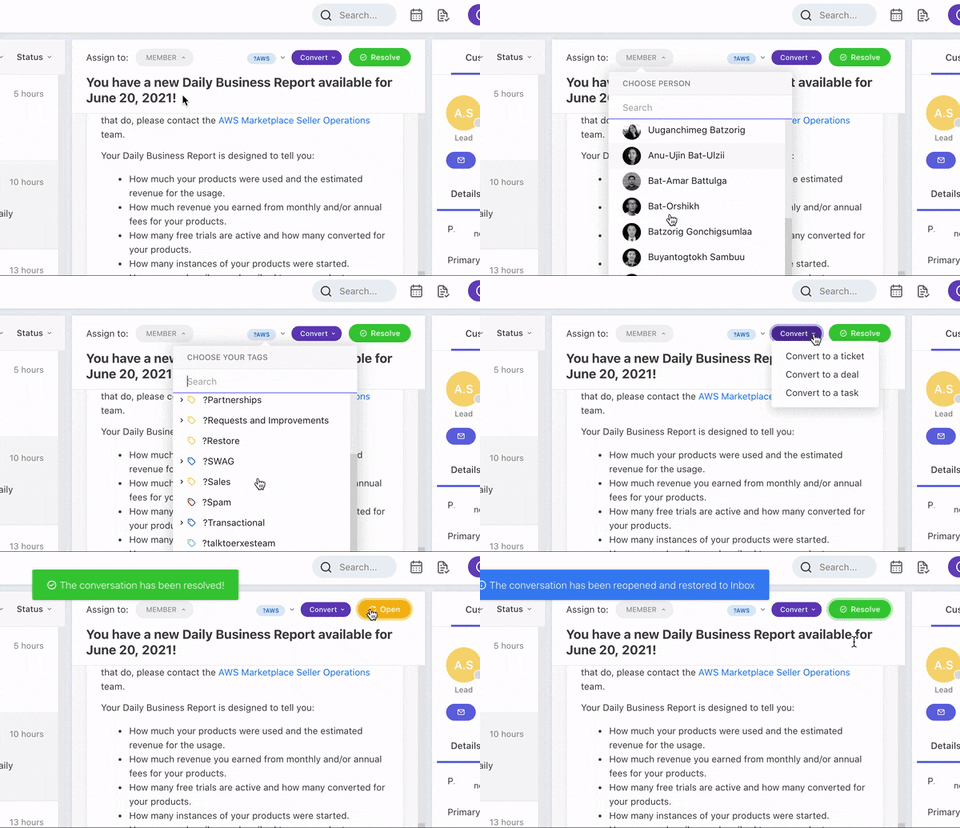
- Assign to: A team member can be assigned to responding to the enquiry.
- No tag: Choose a tag to give to the enquiry (e.g. proposals, complaints, etc.)
- Convert: Choose a field, board or channel to convert the enquiry to.
- Board
- Pipeline
- Stage
- Name
- Convert to a ticket: The enquiry will be sent to the ticket board.
- Convert to a deal: The enquiry will be sent to the sales pipeline.
- Convert to a task: The enquiry will be sent to the task board.
Resolve: Close and move the enquiry to the resolved section. This makes it easier to focus on the unresolved issues.
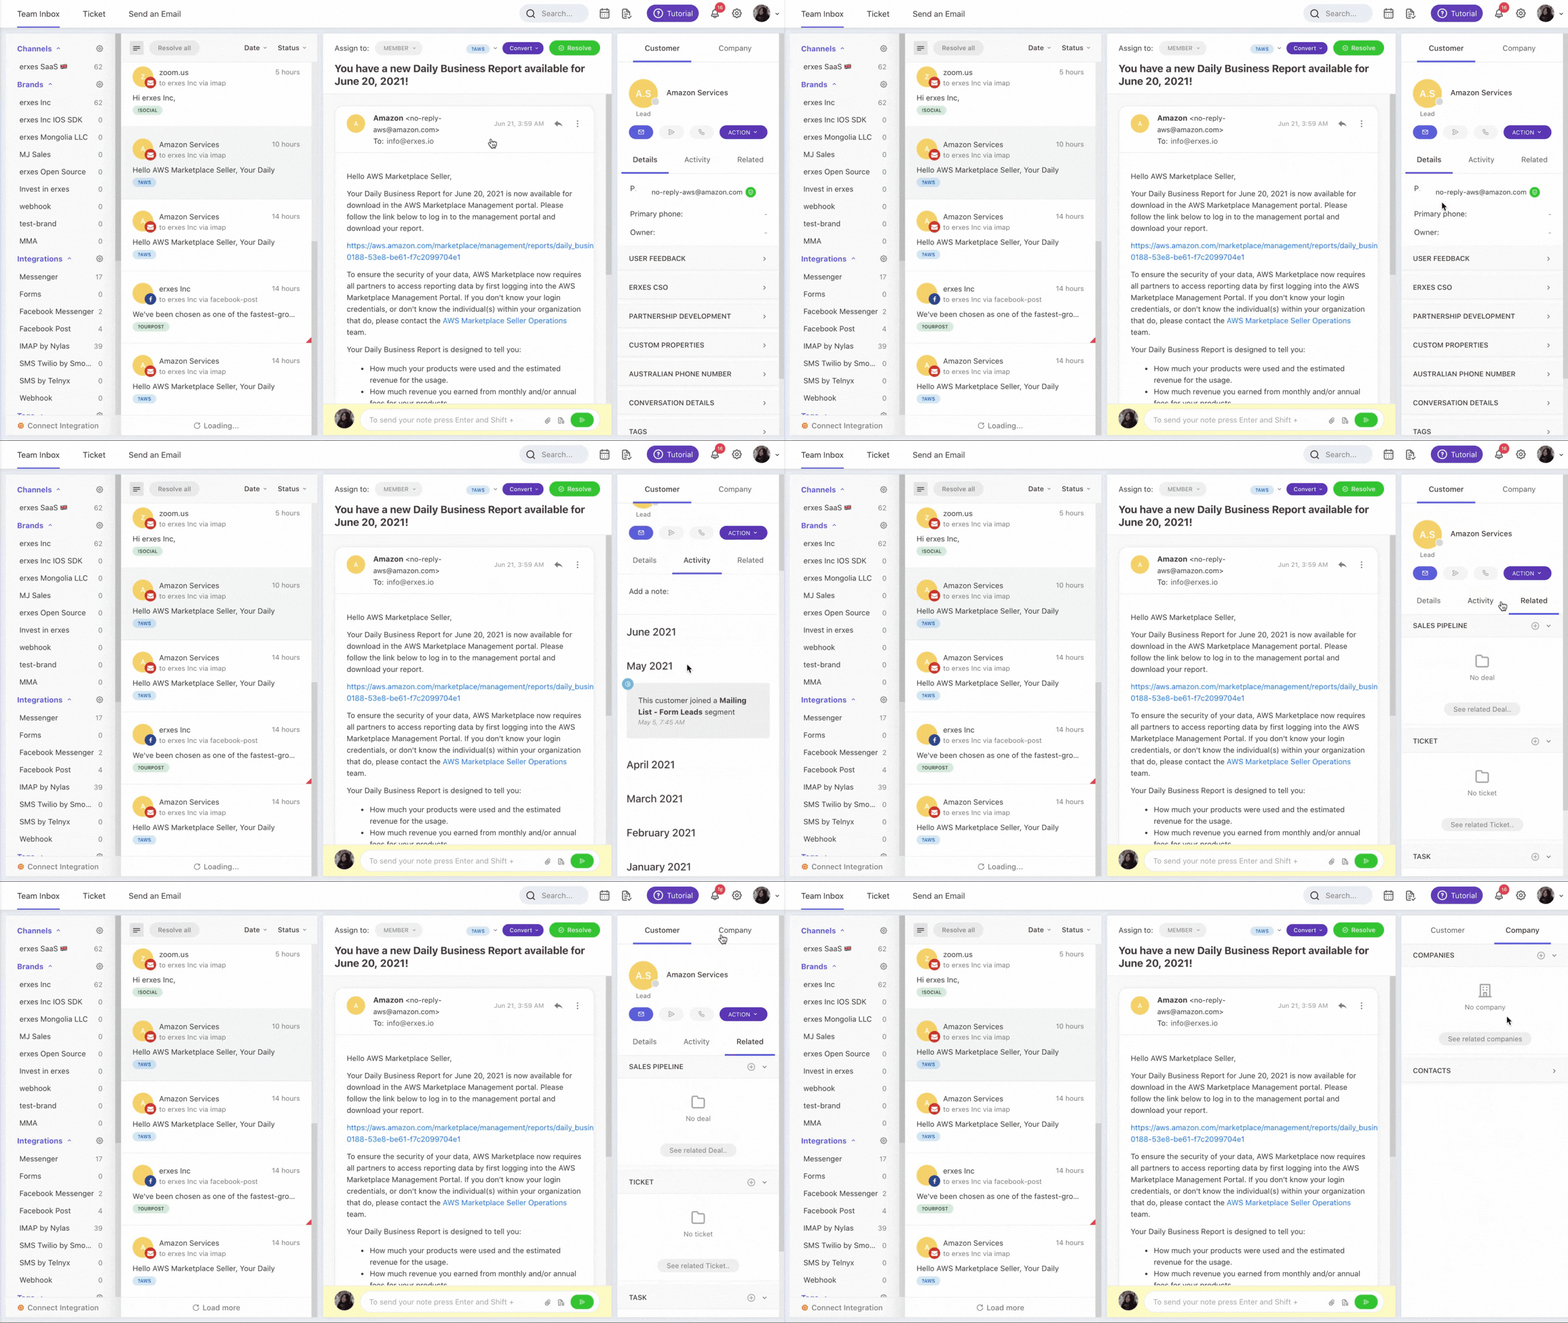
- The customer and company information column is conveniently located on the right of the messaging area. You are able to view the following information.
- Customer
- Company
- Action: These are the adjustments you can do on this column.
- Edit
- Merge: You can merge different customer information such as emails, phone numbers, etc.
- Delete
- Status: You can change the status of the customer in terms of their stance with you.
- Lead: A person who is preparing to buy services or products from your organization.
- Customer: A person who has already bought services or products from your organization.
- Details
- Activity: This shows previous interactions with the customer/company.
- Related: This shows all the cards related to the customer/company.
Campaign
Start converting your prospects into potential customers through Email, SMS, Messenger or more interactions to drive them to a successful close.
- Please follow the steps for setup: Engage
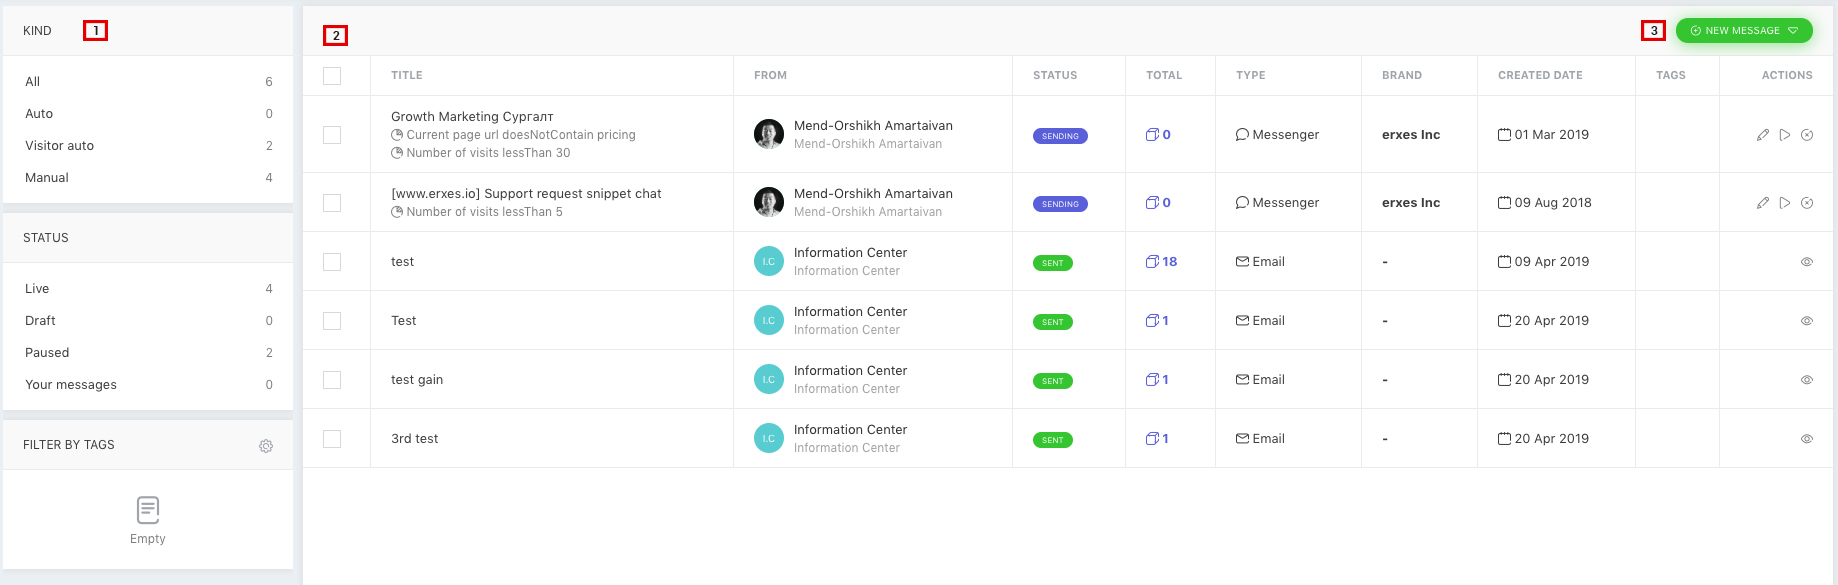
- Filter by Kind, Status, Tags
- List of Created Engage
- Click New Message
- Please follow the steps for setup: Engage->New Message
The Engage feature consists of three types of messages:
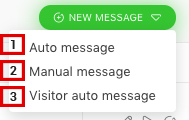
- Auto message
- Manual message
- Visitor auto message
Auto message
Send mass emails to your target customers automatically at scheduled time. The chosen segments for the customers will be updated automatically. You may pause your emails at any time.
- Please follow the steps for setup: Engage->New Message-> Choose Channel

- Insert Title for Auto Message
- Choose Channel
- Click Next
- Please follow the steps for setup: Engage->New Message-> Choose Channel->
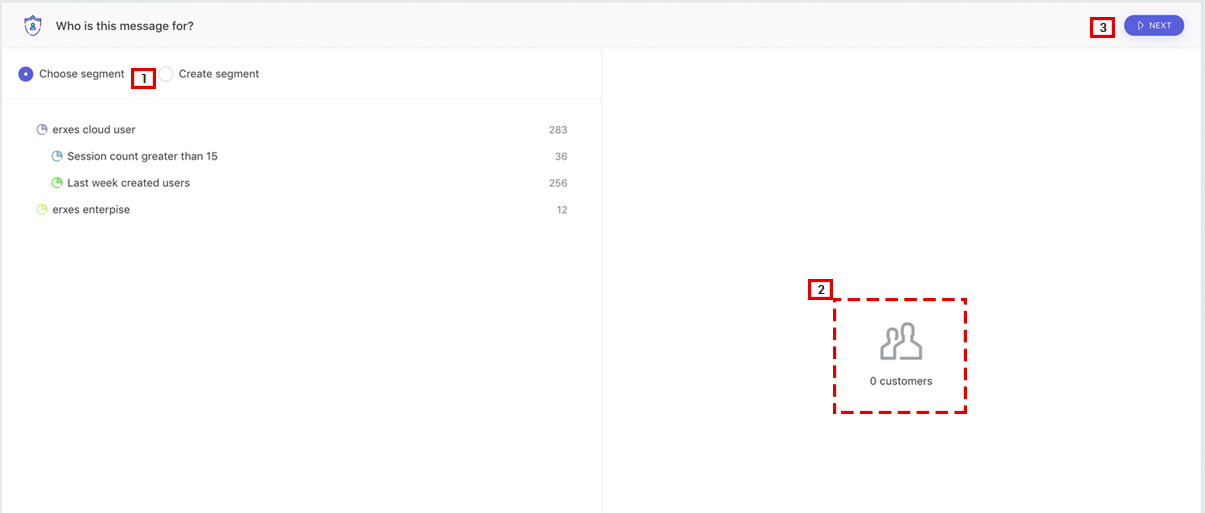
- Choose Segment/Create Segment
- Number of customers
- Click Next
- Please follow the steps for setup: Engage->New Message-> Choose Channel-> Compose your message

- Type your message
- Choose team member to send from
- Insert email subject
- Choose email template
- Attach files
- Set your schedule
- Set your month
- Set your day
- Set time
- Appearance of message
- Click Save to send
- Please follow the steps for setup: Engage

- Pause/Send message automatically at any time
Manual Message
Main function of Manual message is to send mass emails only once
- Please follow the steps for setup: Engage->New Message->Manual message->Choose Channel
- Insert Title for Manual Message
- Choose Channel
- Click Next
- Please follow the steps for setup: Engage->New Message->Manual message->Choose Channel->Choose Segment
- Choose Segment
- Numbers of customer to receive manual message
- Click Next
- Please follow the steps for setup: Engage->New Message->Manual message->Choose Channel->Choose Segment->Compose message
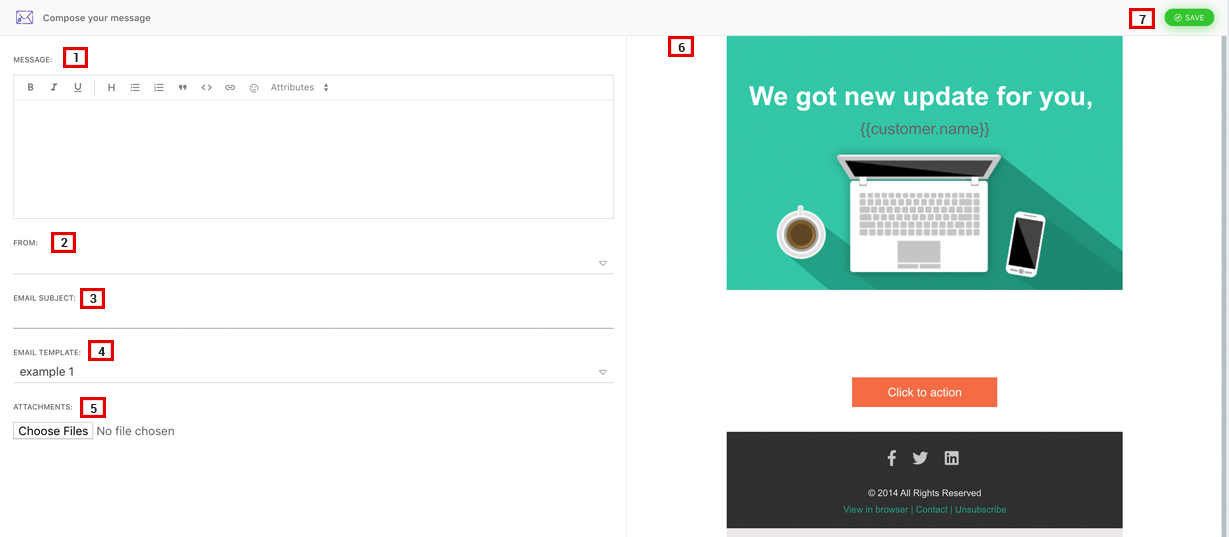
- Compose your message
- Choose Team member
- Insert Email subject
- Choose Email Template
- Attach Files
- Appearance of email
- Click Save
Visitor Auto message
Visitor Auto message is displayed for unregistered users who visits company’s integration.
- Please follow the steps for setup: Engage->New Message->Visitor Auto message->Add Rule
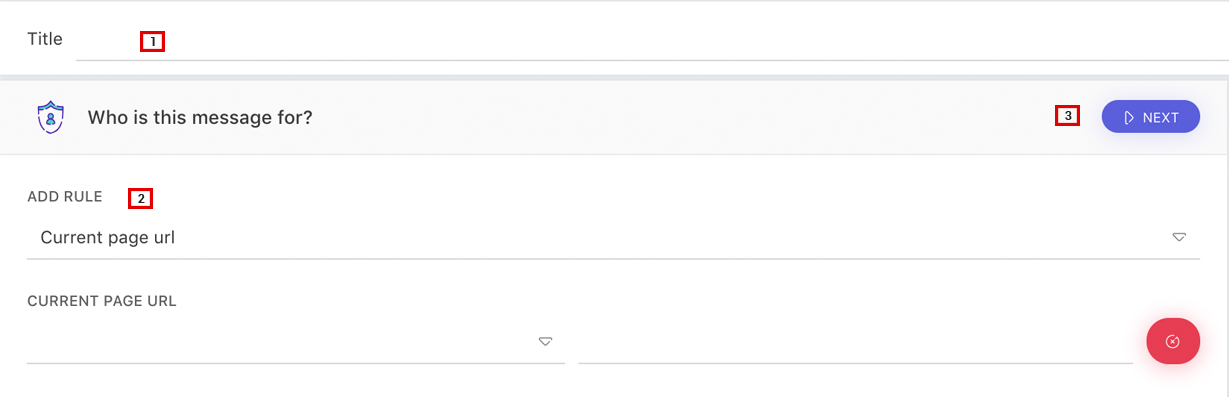
- Title for Visitor Auto message
- Add rule for visitors
- Click Next
- Please follow the steps for setup: Engage->New Message->Visitor Auto message->Add Rule->Compose your message

- Compose your message
- Write your message
- Select team member
- Choose brand
- Choose type to send auto message
- Appearance of auto message
- Click Save
Check how well you use team inbox.
- Assign member on conversation
- Communicate team members on internal note
- Input additional information on customer contact while communicating by editing the data
- Merge duplicate data created under the same person
- Resolve conversation once it’s resolved
- Convert conversation to Ticket/Task/Sale
- See more information about the customer from Tracked Data to understand better