Tickets that are found within the Ticketboard they are used for receiving, maintaining, and resolving inquiries the client/customers have made. This is a tool that is used for you to organize the inquiries in a well mannered way so you do not lose track of the all the inquiries the client has made.
How to create tickets:
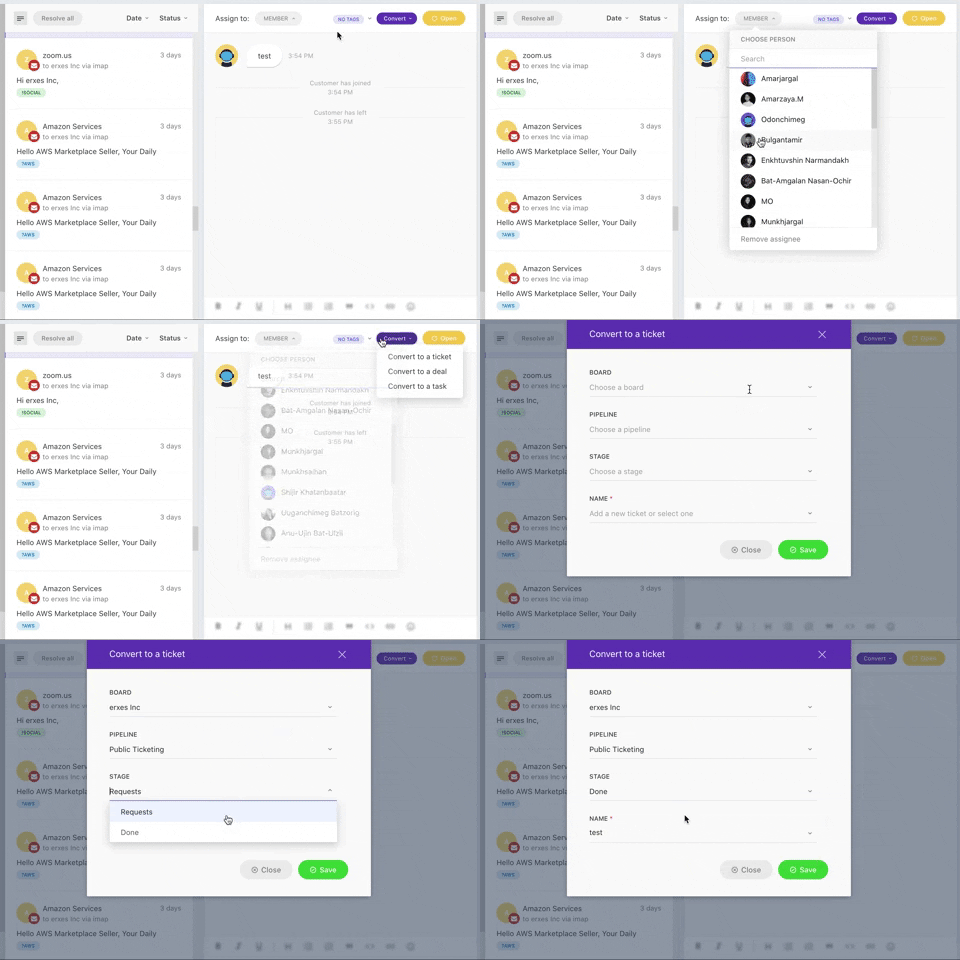
You can create Tickets straight from the team inbox. Before creating the Ticket first you will need to assign team member(s) for the given conversation with the client. To assign a team member to the conversation select the member within the Assign to section that is located at the conversation toolbar. After assigning a team member(s), in order to create a ticket you need to click the Convert button on top of the conversation toolbar. After clicking the Convert button you will see the following options:
- Convert to a ticket: Create a ticket from the conversation.
- Convert to a deal: Create a deal from the conversation.
- Convert to a task: Create a task from the conversation.
You will need to select the Convert to a ticket option in order to create a ticket. After clicking the Convert to a ticket follow these steps to create your tickets:
- Select the Board
- Select the Pipeline
- Select the Stage
- Write the Name of the ticket that briefly describes the inquiry
You can add more details to the Ticket later in the Ticketboard.
Creating a card manually:
You can create Tickets manually from the Support section that is located at the left hand side menu bar. Doing so will take you to the Ticketboard section, from here:
- Select the Board
- Select the Pipeline
- Select the Stage
- Click the +Add Task from the bottom of each Stage
- Write the Name of the ticket that briefly describes the inquiry
- Click Save
Once the convesation has been converted to a ticket, the process of creating your ticket is not fully complete. Within the ticket section the customer, company, and other required fields will need to be entered and filled out. Also the priority and labels will also need to be added and managed. If a team member that was not assigned the ticket is required to participate, you can mentioned them (@) or assign them in the note/ticket section.
How to edit your ticket:
After creating your Ticket you can go to the Ticketboard to modify and make additional changes to your tickets. You can modify your Ticket based on the following:
- Priority: Add the card’s level of importance.
- Labels: Add a label to filter cards to make them easier to distinguish and identify
- Checklist: Add a checklist of tasks needed to complete the card. You can check off different tasks to keep track of you and your team members’ progress.
- Watch: If you would like to receive notifications on the progress of the card, leave the eye open. Conversely, close the eye to not receive notifications on the progress of the card.
- Copy: Click to copy everything in the ticket.
- Archive: Click on the card to archive and make the card invisible. Go into your archive to fully delete a card.
- Upload an Attachment
- Description
- New note: Add new notes and updates to the ticket:
- B - Write in Bold
- I - Write in Italica
- Create a numbered list
- Create bullet points
- Create Hyperlinks
- Remove Hyperlinks
- Add emojis
- Upload pictures
- Activity: Click to view the timeline of all of the ticket's activity.
- Notes: Click to view all of the ticket's notes.
- Task: Click to see all of the ticket's added tasks.
- Close Date: Add a date and time the card should be closed.
- Assigned to: Assign team member(s) who will be taking care of the inquiry.
- Source: Select the source of the inquiry.
- Companies: Link the company that has made the inquiry.
- Customers: Link the customer that has made the inquiry.
- Sales Pipeline: See the deals the ticket is related to.
- Task: Link a task to the inquiry.

Linking Companies and Customers:
After creating your Ticket and making modifications to the ticket as mentioned above, you will need to link the Companies/Customers to the ticket so you can keep the inquiry tickets well organized.
Linking Companies:
- Click the + button that is located at the Companies tab
- Associate tab will appear
- Type in the Name of the company
- If the company is not in Contact Database, select Create a new Company
- New Company tab will appear and here you can enter the Company's details
- Click Save
- Click the + next to the company you want to select
- Should be added to the UNKNOWN's Company
- Click Select

Linking Customers:
- Click the + button that is located at the Customers tab
- Associate tab will appear
- Type in the Name of the customer
- If the company is not in Contact Database, select Create a new Customer
- New Company tab will appear and here you can enter the Customer's details
- Click Save
- Click the + next to the company you want to select
- Should be added to the 'S Customer
- Click Select
- Repeat if you have more than one customer from the same copmany.

Filter through tickets and archived tickets:
You can filter your Tickets you have created for a more organized way of seeing your Tickets. You can also see the Tickets that have been archieved as well.
Filtering Tickets:
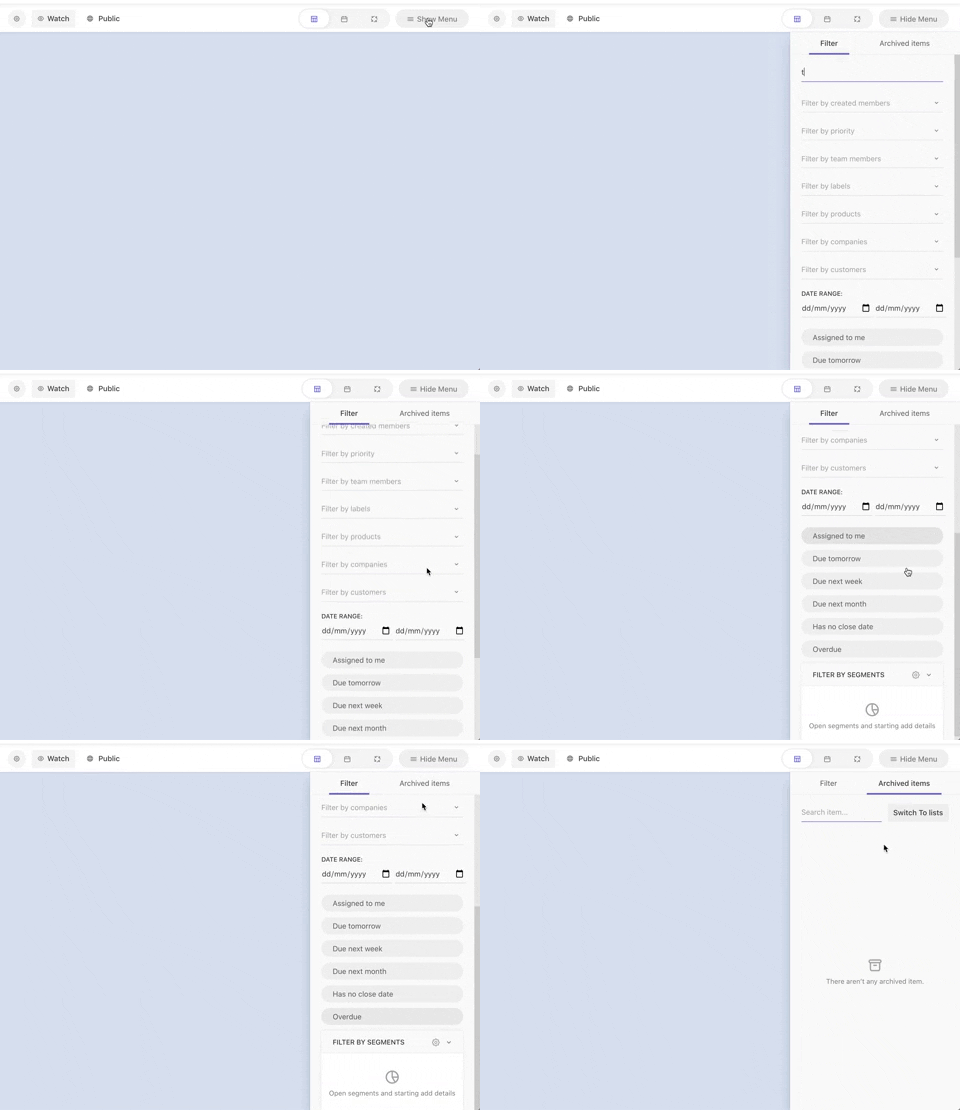
- Click on Show Menu
- Filter properties are shown as:
- Search: Search for specific Tickets
- Filter by created members: See tickets created by certain members.
- Filter by priority: See tickets with certain priority levels.
- Filter by team members: See tickets assigned to certain members.
- Filter by labels: See tickets with certain labels.
- Choose a source: See tickets with certain sources.
- Choose companies: See tickets linked with certain companies.
- Choose customers: See tickets linked with certain customers.
- Date range: See tickets from a certain date range.
- Assigned to me: See tickets assigned to you.
- Due tomorrow: See tickets due tomorrow.
- Due next week: See tickets due next week.
- Has no close date: See tickets with no due date.
- Overdue: See overdue tickets.
- Filter by segment: See certain segments.
Archived Tickets:
- Click Show Menu
- Select Archived Items
REALATED PAGES:
Check how well you use tickets.
- Assign member on the card
- Insert information on description
- Label the card
- Create checklists
- Create properties in the card
- Connect Task & Sale
- Leave note for the team members
- Create campaign related to ticket
- Invite dedicated team members to the pipeline only
- Search particular information you would like to know about
- See filtered views
- See monthly view
- Resolve the card